

KNIT YOUR OWN ZOO
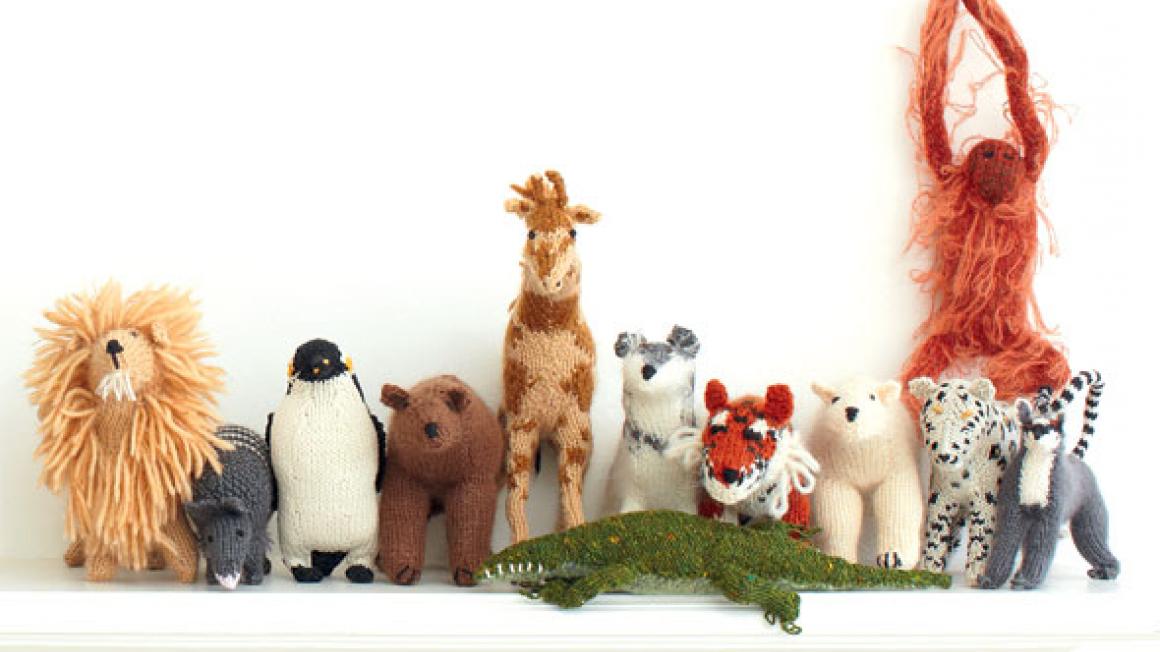
Knitted zoo animals are the perfect easy-care companions – you don’t have to adapt your house to accommodate a giraffe, bring home freshly killed wildebeest for a lion, fly in eucalyptus leaves for a koala, or build an extension for an elephant. You get all the pleasure of the wild animal with none of the headaches.
We couldn’t include every animal, so our selection is necessarily idiosyncratic. We have included many of the obvious – the lion, tiger, elephant, giraffe – but we’ve also added ones we just loved – the fruit bat, armadillo and anteater. And there are the stranger-looking, less cuddly ones that we thought should have a place as well – the camel, crocodile and mandrill.
You can knit your own endangered species, and you can even knit two of each animal and create your own Noah’s ark. For the beginner, the one-colour animals like the bear and seal are a good place to start, working up through the slightly more complicated, like the anteater and armadillo. With simply a pair of knitting needles, some yarn and our patterns, the animals of the frozen wastes of the Antarctic, the deserts of Africa, the jungles of Asia, and the outback of Australia can all be yours.
Knit Your Own Zoo, by Sally Muir and Joanna Osborne, is published by Collins & Brown, priced £12.99.
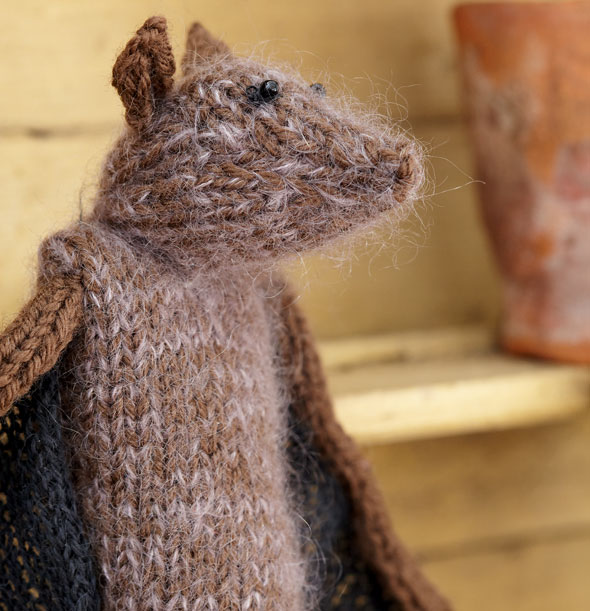
How to knit a fruit bat
The fruit bat has a fox-like face, with tiny black beads for eyes. He can hang by his back legs from a shelf or mantelpiece.
MEASUREMENTS
Height: 18cm (7in)
Wingspan: 33cm (13in)
MATERIALS
- Pair of 2.75mm knitting needles
- 20g of Rowan Pure Wool 4ply in Mocha 417 (mo)
- 15g of Rowan Kidsilk Haze in Mud 652 (mu)
Note: some of this animal uses 1 strand of mo and 1 strand of mu held together, and this is called momu
- 15g (½oz) of Rowan Fine Lace in Gunmetal 929 (gu)
- 3 pipecleaners for legs
- Tiny amount of Rowan Pure Wool 4ply Black (bl) in for eyes ◆
- 2 tiny black beads for eyes and sewing needle and black thread for sewing on
ABBREVIATIONS
- alt alternate
- approx approximately
- beg begin(ning)
- cm centimetre
- cont continue
- foll(s) follow(s)(ing)
- g grams
- icos including cast (bound) off stitch. After casting (binding) o the stated number of stitches, one stitch remains on the right-hand needle. This stitch is included in the number of the following group of stitches.
- in inches inc work into front and back of next stitch to increase by one stitch
- k knit
- k2(3)tog knit next two (three) stitches together
- p purl
- p2(3)tog purl next two (three) stitches together
- rem remain(ing)
- rep repeat
- rev reverse
- RS right side
- sk2po slip one stitch, knit two stitches together, pass slipped stitch over
- st(s) stitch(es)
- st st stocking (stockinette) stitch
- w&t wrap and turn. See wrap and turn method, top right.
- WS wrong side
- [ ] work instructions within square brackets as directed
* work instructions after asterisk(s) as directed
Wrap and turn method (w&t)
Knit the number of stitches in the rst short row. Slip the next stitch purlwise from left-hand to right-hand needle. Bring yarn forward then slip the stitch back on to left-hand needle. Return yarn to the back. On a purl row use the same method, taking yarn back then forward.
BACK
With momu, cast on 6 sts. Beg with a k row, work 2 rows st st.
- Row 3: Inc, k4, inc. (8 sts)
- Row 4: Purl.
- Row 5: Inc, k6, inc. (10 sts)
- Row 6: Purl.
- Row 7: Inc, k8, inc. (12 sts)
- Row 8: Purl. Work 8 rows st st.
- Row 17: Inc, k10, inc. (14 sts)
- Row 18: Purl. Work 8 rows st st.
- Row 27: Inc, k12, inc. (16 sts)
- Row 28: Purl. Work 6 rows st st.
- Row 35: Inc, k14, inc. (18 sts)
- Row 36: Purl. Work 6 rows st st.
Shape shoulders
- Row 43: Cast (bind) off 7 sts, k to end. (11 sts)
- Row 44: Cast (bind) off 7 sts, p to end. (4 sts) Work 2 rows st st.
- Row 47: [Inc] 4 times. (8 sts)
- Row 48: Purl.
- Row 49: Inc, k6, inc. (10 sts)
- Row 50: Purl. Work 6 rows st st.
- Row 57: K8, wrap and turn (leave 2 sts on left-hand needle unworked).
- Row 58: Working on centre 6 sts only, p6, w&t.
- Row 59: K6, w&t.
- Row 60: P6, w&t.
- Row 61: K6, w&t.
- Row 62: P6, w&t.
- Row 63: K8. (10 sts in total)
- Row 64: Purl.
- Row 65: K2tog, k6, k2tog. (8 sts)
- Row 66: Purl.
- Row 67: Knit.
- Row 68: P2tog, p4, p2tog. (6 sts)
- Row 69: Knit.
- Row 70: P2tog, p2, p2tog. (4 sts)
- Row 71: Knit.
- Row 72: [P2tog] twice. (2 sts)
- Row 73: K2tog and fasten off.
FRONT
With momu, cast on 6 sts. Beg with a k row, work 2 rows st st.
- Row 3: Inc, k4, inc. (8 sts)
- Row 4: Purl.
- Row 5: Inc, k6, inc. (10 sts)
- Row 6: Purl.
- Row 7: Inc, k8, inc. (12 sts)
- Row 8: Purl. Work 8 rows st st.
- Row 17: Inc, k10, inc. (14 sts)
- Row 18: Purl. Work 8 rows st st.
- Row 27: Inc, k12, inc. (16 sts)
- Row 28: Purl. Work 6 rows st st.
- Row 35: Inc, k14, inc. (18 sts)
- Row 36: Purl. Work 6 rows st st.
Shape shoulders
- Row 43: Cast (bind) off 7 sts, k to end. (11 sts)
- Row 44: Cast (bind) off 7 sts, p to end. (4 sts) Work 2 rows st st.
- Row 47: [Inc] 4 times. (8 sts)
- Row 48: Purl.
- Row 49: Inc, k6, inc. (10 sts)
- Row 50: Purl. Work 8 rows st st.
- Row 59: K2tog, k6, k2tog. (8 sts)
- Row 60: Purl.
- Row 61: K2tog, k4, k2tog. (6 sts)
- Row 62: Purl.
- Row 63: K2tog, k2, k2tog. (4 sts)
- Row 64: Purl.
- Row 65: [K2tog] twice. (2 sts)
- Row 66: P2tog and fasten off.

Right Wing
With gu cast on 40 sts. Beg with a k row, work 3 rows st st.
- Row 4: P38, wrap and turn (leave 2 sts on left-hand needle unworked).
- Row 5: Knit. Rep rows 4-5 twice more.
- Row 10: P36, w&t (leave 4 sts on left-hand needle unworked).
- Row 11: Knit Rep rows 10-11 twice more.
- Row 16: P34, w&t (leave 6 sts on left-hand needle unworked).
- Row 17: Knit. Rep rows 16-17 twice more.
- Row 22: P32, w&t (leave 8 sts on left-hand needle unworked).
- Row 23: Knit. Rep rows 22-23 twice more.
- Row 28: P30, w&t (leave 10 sts on left-hand needle unworked).
- Row 29: Knit. Rep rows 28-29 twice more. Row 34: P28, w&t (leave 12 sts on left-hand needle unworked).
- Row 35: Knit. Rep rows 34-35.
- Row 40: P26, w&t (leave 14 sts on left-hand needle unworked).
- Row 41: Knit.
- Row 42: Purl across all sts. Cast (bind) off.
Left Wing
With gu, cast on 40 sts. Beg with a k row, work 2 rows st st.
- Row 3: K38, wrap and turn (leave 2 sts on left-hand needle unworked).
- Row 4: Purl. Rep rows 3-4 twice more.
- Row 9: K36, w&t (leave 4 sts on lefthand needle unworked).
- Row 10: Purl. Rep rows 9-10 twice more.
- Row 15: K34, w&t (leave 6 sts on left-hand needle unworked).
- Row 16: Purl. Rep rows 15-16 twice more.
- Row 21: K32, w&t (leave 8 sts on left-hand needle unworked).
- Row 22: Purl. Rep rows 21-22 twice more.
- Row 27: K30, w&t (leave 10 sts on left-hand needle unworked).
- Row 28: Purl. Rep rows 27-28 twice more.
- Row 33: K28, w&t (leave 12 sts on left-hand needle unworked).
- Row 34: Purl. Rep rows 33-34 twice more.
- Row 39: K26, w&t (leave 14 sts on left-hand needle unworked).
- Row 40: Purl. Work 2 rows st st across all sts. Cast (bind) off.
Front Legs (make 2 the same)
With mo, cast on 5 sts. Beg with a k row, work 48 rows st st.
Row 49: K2tog, k3. (4 sts) Work 13 rows st st. Cast (bind) off.
Back Legs (make 2 the same)
With mo, cast on 5 sts. Beg with a k row, work 10 rows st st. Cast (bind) off.
Ear (make 2 the same)
With mo, cast on 4 sts. Beg with a k row, work 4 rows st st.
Row 5: [K2tog] twice. (2 sts)
Row 6: P2tog and fasten off.
To Make Up
SEWING IN ENDS Sew in ends but leave cast on and cast (bound) off rows for sewing up.
HEAD With WS together, sew top of head to bottom on RS, then stuff firmly.
BODY WS together, sew across shoulders.
LEGS Pipecleaners are used to stiffen the legs and bend them into shape. Leave 3cm (1½in) free at claw end and sew leg up around pipecleaner. For front legs, use one pipecleaner for each leg and twist other ends around each other inside body. Back legs only need one pipecleaner bent into a ‘U’ shape and with claw ends left free as for front legs. Sew front legs to side of body at shoulder seam, sew down one side of body on outside, attaching back legs to bottom of side seam with 2cm (¾in) between legs. Sew along bottom of body and up second side leaving a 2.5cm (1in) gap in side for stuffing. Wrap protruding pipecleaners (claws) in mo (see below).
STUFFING Stuff body firmly (use 100% polyester or kapok), sew up gap. HEAD Sew chin approx 1.5cm (½in) from neck to chest so that head faces forward.
WINGS Press the wings with a damp cloth before sewing up as they have a tendency to curl. Sew cast (bound) off row to underside of front legs where knitting starts (leave claw free). Sew long edge of wing down side seam of body and along outside of back leg to where knitting stops and claw begins.
EARS Sew ears to top of head positioned as in photograph, with WS facing forward and 3 sts between ears.
EYES With bl, sew 2-loop French knots positioned as in photograph, with 3 sts between them. Sew tiny black bead on top of each knot.
CLAWS Fold back claws towards back so that you can hang bat up. Fold front claws over towards front and have wings either outstretched or folded up.
Wrapping pipecleaners in yarn
This method is used for very thin legs and for claws: if possible, use coloured pipecleaners and try to match the colour of the wrapping yarn. Leaving a 5cm (2in) tail of free yarn, tightly wrap the yarn around the pipecleaner, making sure no pipecleaner chenille pokes through. Continue wrapping down the pipecleaner to as close to the tip as possible, then wrap the yarn back up to the top of the pipecleaner. Knot the two ends and then slip them in to the body. If there is a little bit of white pipecleaner chenille showing, colour it in with a matching felt-tip pen.
A little dab of clear glue will stop the wrapping slipping off the end of the pipecleaner.
Gone batty
Geraldine Gaffney made the perfect pet – low on maintenance but high on cuddles
‘Geraldine, I have a job for you.’ When my boss utters these words, it usually means she needs me to manage a new project or put together a presentation. But this time, she said: ‘I want you to knit a bat!’
Ever one for a challenge, I agreed and ordered the wool. Being an avid knitter (more of the hats and jumpers kind) I set to with a little apprehension. All in all, it took about 10 hours to knit all the body parts. The pattern was simple and I had all the parts laid out, only Googling some of the terms I wasn’t familiar with. Next came the fiddly bit – the sewing up and stuffing of Batty. Another two to three hours and he was ready. The opinion in the office is that... it is definitely a bat. My boss loves Batty and he hangs on her mantelpiece in the office.
So, a job well done. It was great fun to do and easy enough for a beginner to knit and sew together. All materials are easily sourced from good knitting-wool suppliers and online.